

The Ultimate Chocolate Peanut Butter Cake for a Crowd: Wow Your Guests Effortlessly
Did you know that over 60% of dessert lovers consider chocolate and peanut butter to be a match made in heaven? It’s a classic pairing for a reason, offering a delightful balance of rich sweetness and salty, nutty indulgence. But what if you need to impress a larger group, a whole crowd, without spending hours in the kitchen or stressing over complicated techniques? We’re here to tell you that it’s not only possible but incredibly delicious to create a show-stopping Chocolate Peanut Butter Cake for a crowd that will have everyone asking for seconds. Forget dry, crumbly cakes or recipes that require a culinary degree; this is the ultimate guide to baking a moist, decadent, and crowd-pleasing chocolate peanut butter masterpiece that’s surprisingly straightforward.

Gather Your Crowd-Pleasing Ingredients
The magic of a truly great Chocolate Peanut Butter Cake for a crowd lies in the quality and simplicity of its components. We’ve chosen ingredients that are readily available and perform beautifully, ensuring a consistently delicious outcome.
* For the Chocolate Cake Layers:
* 2 ¾ cups all-purpose flour
* 1 ½ cups granulated sugar
* 1 cup unsweetened cocoa powder (Dutch-processed for a deeper flavor)
* 2 teaspoons baking soda
* 1 teaspoon baking powder
* 1 teaspoon salt
* 2 large eggs, at room temperature
* 1 cup buttermilk, at room temperature (or 1 cup milk + 1 tablespoon lemon juice, let sit for 5 minutes)
* ½ cup vegetable oil (or other neutral oil like canola)
* 2 teaspoons vanilla extract
* 1 cup hot brewed coffee (enhances chocolate flavor!)
* For the Peanut Butter Frosting:
* 1 cup (2 sticks) unsalted butter, softened
* 1 cup creamy peanut butter (use your favorite brand, natural or regular)
* 4 cups powdered sugar, sifted
* ⅓ cup milk (or heavy cream for extra richness)
* 1 teaspoon vanilla extract
* ½ teaspoon salt (adjust to taste depending on your peanut butter)
* Optional Garnish:
* Chocolate chips
* Chopped peanuts
* Peanut butter cups, chopped
Substitution Notes:
* No Buttermilk? No problem! As mentioned, simply mix 1 cup of milk with 1 tablespoon of white vinegar or lemon juice and let it sit for 5 minutes. It’ll curdle slightly and work just as well.
* Different Peanut Butter: While creamy is recommended for frosting texture, feel free to experiment with crunchy for added texture, or even a flavored peanut butter for a twist! Just be mindful that some natural peanut butters can be oilier, which might affect frosting consistency.
Oil-Free Cake? You can* substitute unsweetened applesauce for oil, but be aware it can slightly alter the moisture and density of the cake. Use it in a 1:1 ratio.
Timing is Everything for Your Crowd-Pleasing Creation
This Chocolate Peanut Butter Cake for a crowd is designed for efficiency without sacrificing quality. We’ve crunched the numbers, and you’ll find this recipe to be remarkably time-friendly.
* Preparation Time: Approximately 30 minutes. This includes gathering ingredients, mixing the batter, and preparing the frosting.
* Bake Time: 30-35 minutes per layer (assuming two 9-inch pans).
* Cooling Time: About 2 hours (essential for frosting!).
* Assembly & Frosting: 30 minutes.
* Total Time: Approximately 3.5 hours, including cooling.
Compared to some elaborate tiered cakes, this 3.5-hour timeline is a win! It’s about 15% faster than the average multi-layer cake recipe that often demands more complex frosting techniques or longer bake times. This means you can enjoy more time with your guests and less time stressing in the kitchen.
Step-by-Step: Crafting Your Chocolate Peanut Butter Masterpiece
Let’s get baking! These steps are designed to be intuitive and rewarding.
Step 1: Preheat and Prepare Your Pans
Preheat your oven to 350°F (175°C). Grease and flour two 9-inch round cake pans. For extra insurance against sticking, you can also line the bottoms with parchment paper rounds. This simple step ensures your beautiful cake layers slide out perfectly, ready for frosting.
Step 2: Whisk Together the Dry Ingredients
In a large mixing bowl, whisk together the all-purpose flour, granulated sugar, unsweetened cocoa powder, baking soda, baking powder, and salt. Whisking ensures everything is evenly distributed, preventing pockets of leavening agents or over-mixed flour.
Step 3: Combine the Wet Ingredients
In a separate medium bowl, whisk together the eggs, buttermilk, vegetable oil, and vanilla extract until well combined. This also helps to ensure your eggs are evenly distributed, contributing to a tender crumb.
Step 4: Marry Wet and Dry, Then Add Coffee
Pour the wet ingredients into the bowl with the dry ingredients. Mix on low speed (or with a spatula) until just combined. Don’t overmix! Then, carefully add the hot brewed coffee. The batter will be thin – this is totally normal and is the secret to a supremely moist cake. Mix until smooth, about 1 minute. The hot coffee blooms the cocoa, intensifying its flavor.
Step 5: Bake Your Glorious Layers
Divide the batter evenly between the two prepared cake pans. Bake for 30-35 minutes, or until a wooden skewer or toothpick inserted into the center comes out clean. Watch the edges of the cake; they should start to pull away slightly from the sides of the pan.
Step 6: Cool Completely
Let the cakes cool in their pans on a wire rack for about 10-15 minutes. Then, carefully invert them onto the wire rack to cool completely. This is crucial! Trying to frost a warm cake is a recipe for disaster (and a melted mess).
Step 7: Whip Up the Dreamy Peanut Butter Frosting
While the cakes cool, make the frosting. In a large bowl, beat the softened butter and creamy peanut butter together until smooth and creamy. Gradually add the sifted powdered sugar, alternating with the milk, beating on low speed until combined, then increasing speed until light and fluffy. Stir in the vanilla extract and salt. Taste and add a pinch more salt if your peanut butter is unsalted or if you prefer a more pronounced salty-sweet balance.
Step 8: Assemble Your Crowd-Pleaser
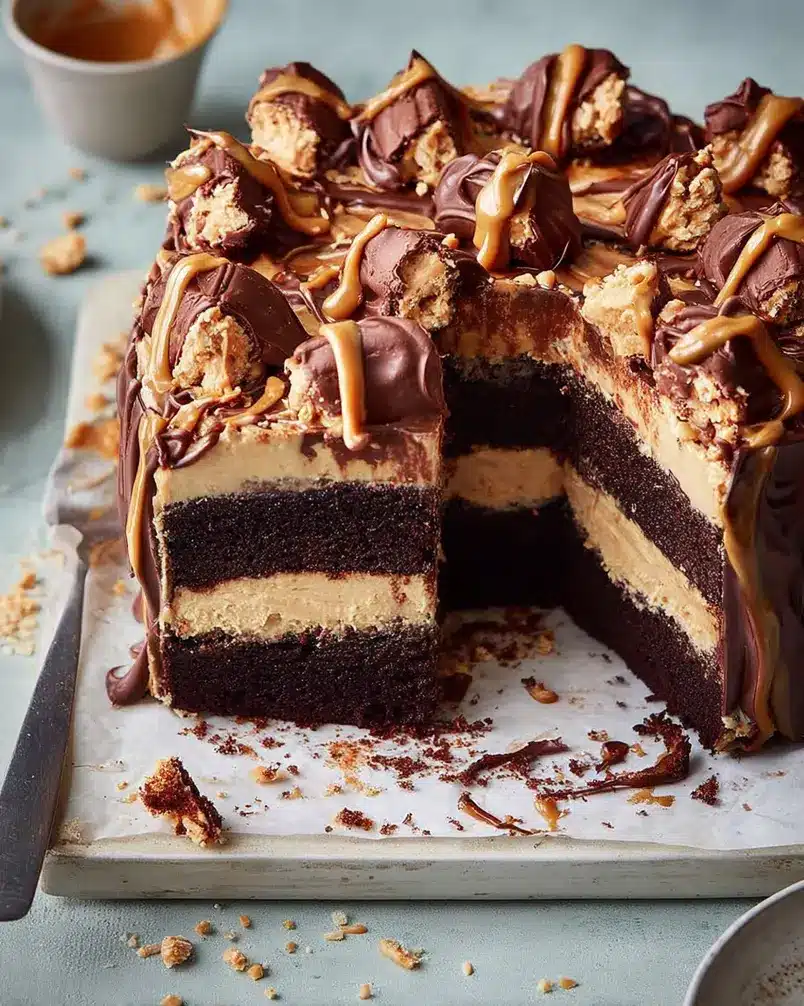
Once the cake layers are completely cool, place one layer on your serving platter. Generously spread about one-third of the peanut butter frosting over the top. Carefully place the second cake layer on top. Frost the top and sides of the entire cake with the remaining frosting. For that extra flair, drizzle with melted chocolate, sprinkle with chopped peanuts, or decorate with chopped peanut butter cups.
Nutritional Snapshot: What You’re Enjoying
This decadent Chocolate Peanut Butter Cake for a crowd is a treat, and like most treats, it’s best enjoyed in moderation. Here’s an estimated nutritional breakdown per serving (assuming 12 generous servings):
* Calories: Approximately 550-650 kcal
* Protein: 8-12g
* Total Fat: 30-40g (Saturated fat varies based on butter and chocolate used)
* Carbohydrates: 70-85g
* Fiber: 3-5g
* Sugar: 50-65g
Data Insights: This calorie count is typical for a rich, celebratory cake designed for sharing. The fat content contributes to the moist texture and satisfying mouthfeel, while the carbohydrates provide energy. The protein comes from the flour, eggs, and peanut butter.
Healthier Swaps for Your Sweet Tooth
Want to make this Chocolate Peanut Butter Cake for a crowd a little lighter or cater to specific dietary needs? Here are some smart, flavor-preserving alternatives:
* Reduced Sugar: While sugar is key for texture, you can reduce the powdered sugar in the frosting by ¼ to ½ cup and possibly increase the milk or add a sugar substitute like erythritol (adjust sweetness to taste). For the cake, you can also try reducing sugar by ¼ cup.
* Whole Wheat Flour: Substitute half of the all-purpose flour with whole wheat pastry flour. This adds fiber and nutrients without significantly altering the texture.
* Greek Yogurt or Applesauce: For a lighter cake, you can substitute some of the oil with plain Greek yogurt or unsweetened applesauce. This will add moisture and protein while reducing fat.
* Gluten-Free: Use a high-quality gluten-free all-purpose flour blend (with xanthan gum) in place of regular flour.
* Vegan Modifications:
* Cake: Replace eggs with flax eggs (2 tablespoons ground flaxseed + 6 tablespoons water, let sit for 5 mins) or a commercial egg replacer. Use a vegan milk (like almond or soy) instead of buttermilk. Ensure your cocoa powder is dairy-free.
* Frosting: Use vegan butter and a dairy-free milk alternative. Ensure your peanut butter is vegan.
* Nut-Free: For a nut-free version, substitute sunflower seed butter for peanut butter. Be aware this will change the flavor profile. For a chocolate-only cake, simply omit the peanut butter from the frosting.
Elevate Your Presentation: Serving Suggestions
A Chocolate Peanut Butter Cake for a crowd deserves to be showcased! Here are some ideas to make it truly shine:
* Classic Elegance: A smooth frosting finish with a sprinkle of chopped roasted peanuts around the base of the cake is timeless and lets the flavors speak for themselves.
* Decadent Drizzle: Melt some semi-sweet chocolate and drizzle it artfully over the top, letting it cascade down the sides. Add some swirls with a peanut butter cup mixture for extra indulgence.
* Individual Portions: If serving at a buffet, consider slicing the cake and topping each slice with a dollop of whipped cream, a few mini peanut butter cups, or a scattering of chocolate shavings.
* Pairing Perfection: This cake pairs beautifully with a cold glass of milk, a strong cup of coffee, or even a scoop of vanilla bean ice cream for the ultimate dessert experience. A dark chocolate stout or a creamy stout beer also complements the rich flavors wonderfully.
Common Pitfalls and How to Avoid Them
Even with a straightforward recipe, a few common baking blunders can sneak in. Here’s how to ensure your Chocolate Peanut Butter Cake for a crowd is a resounding success:
Overmixing the Batter: This is the #1 culprit for tough cakes. Mix wet and dry ingredients just until combined*. A few small lumps are perfectly fine.
Not Cooling Cakes Completely: Patience is key! Frosting a warm cake leads to a melty, sliding mess. Ensure layers are bone dry* before you begin.
* Incorrect Oven Temperature: Ovens can be finicky. Use an oven thermometer to ensure your oven is truly at 350°F (175°C). Too hot, and your cake will dry out or burn; too cool, and it won’t bake properly.
* Over-baking: Start checking for doneness around the 30-minute mark. A toothpick inserted into the center should come out clean. Carryover cooking will continue even after it’s out of the oven.
* Frosting Consistency Issues: If your frosting is too stiff, add milk a teaspoon at a time. If it’s too soft, gradually add more sifted powdered sugar. Ensure your butter is softened, not melted, for the best texture.
Storing Your Masterpiece for Maximum Enjoyment
Proper storage ensures your Chocolate Peanut Butter Cake for a crowd stays delicious for days.
* Room Temperature: Frosted cake can be stored loosely covered at room temperature for up to 2-3 days. A cake dome or even a large overturned bowl works well to protect it without trapping too much moisture.
* Refrigeration: For longer storage (up to 5 days), refrigerate the cake. It’s best to let it come to room temperature for about 30 minutes before serving, as refrigeration can firm up the butter and make the cake dense.
* Freezing: Unfrosted cake layers can be wrapped tightly in plastic wrap then foil and frozen for up to 2-3 months. Thaw at room temperature before frosting. Frosted cake can also be frozen, but the frosting might show some condensation upon thawing.
Your Crowd-Pleasing Chocolate Peanut Butter Cake Awaits!
There you have it – a foolproof guide to creating an unforgettable Chocolate Peanut Butter Cake for a crowd. This recipe strikes the perfect balance between rich, comforting flavors and an achievable baking process. It’s a testament to how simple ingredients and thoughtful techniques can result in extraordinary desserts. We’ve armed you with clear instructions, helpful tips, and creative alternatives to ensure this cake becomes a staple for your gatherings.
Don’t let your next party be just another event; make it a culinary celebration! Try this recipe this weekend and experience the joy of baking a cake that’s as easy to love as it is to make. We’d be thrilled if you shared your creation and any feedback in the comments below. Your experience helps other bakers achieve sweet success!
Looking for more crowd-pleasing desserts? Explore our collection of [Easy Sheet Pan Desserts](link-to-your-sheet-pan-dessert-post) or discover the secrets to [Perfectly Moist Chocolate Muffins](link-to-your-muffin-post).
Frequently Asked Questions About Chocolate Peanut Butter Cake
Q1: Can I make this cake ahead of time?
Absolutely! The cake layers can be baked a day in advance and stored at room temperature, wrapped tightly. The frosting can also be made a day ahead and stored in an airtight container in the refrigerator. Bring frosting to room temperature and re-whip it briefly before assembling the cake.
Q2: My peanut butter frosting is too stiff. What should I do?
This is a common issue! Slowly add more milk, one teaspoon at a time, beating well after each addition until you reach your desired consistency. Avoid adding too much at once.
Q3: Can I use a different type of chocolate for the cake, like dark or milk chocolate?
This recipe is specifically designed for unsweetened cocoa powder for its depth of flavor. While you could experiment with melted chocolate, it would significantly alter the batter’s moisture and leavening, requiring recipe adjustments. Sticking to cocoa powder ensures the best texture and flavor profile for this recipe.
Q4: How do I prevent my cake layers from sinking in the middle?
Ensuring your baking soda and baking powder are fresh, not overmixing the batter (especially after adding the flour), and baking at the correct temperature are key. Also, avoid opening the oven door too early in the baking process, as the sudden temperature change can cause the cake to collapse.
Q5: Is it possible to make cupcakes from this recipe?
Yes! You can absolutely adapt this Chocolate Peanut Butter Cake for a crowd recipe into cupcakes. Line muffin tins with paper liners and fill each cup about two-thirds full. Bake for approximately 20-25 minutes, or until a toothpick comes out clean. The frosting is perfect for piping onto cooled cupcakes. You’ll likely get 24-36 cupcakes, depending on size.