

Did you know that the average person spends nearly 6 hours per week on meal preparation, yet often struggles to find recipes that are both beautiful and delicious? What if we told you there’s a dessert that defies this challenge, transforming simple apples into edible art that’s surprisingly straightforward to make? Today, we’re diving into the enchanting world of Baked Apple Roses, a visually stunning treat that will impress your guests and delight your taste buds. This recipe offers a delightful alternative to traditional apple pies, requiring less fuss but delivering maximum “wow” factor, proving that elegance in the kitchen doesn’t have to be complicated.

The Enchanting Ingredients for Baked Apple Roses
Crafting these delicate Baked Apple Roses is an adventure in simplicity, requiring just a few key players to create something truly magical. We’ve found that using a mix of sweet and tart apples offers the most complex flavor profile, but feel free to experiment with your favorites!
* Apples: 3-4 medium apples (e.g., Honeycrisp, Fuji, Gala for sweetness; Granny Smith for a touch of tartness). Look for apples that hold their shape well when cooked.
* Puff Pastry: 1 sheet (about 9-10 oz), thawed according to package directions. This is the secret to those gorgeously flaky petals.
* Granulated Sugar: 2 tablespoons, plus extra for dusting. This helps caramelize the apples and adds a touch of sweetness.
* Ground Cinnamon: 1 teaspoon. The quintessential spice that pairs perfectly with apples.
* Lemon Juice: 1 tablespoon. A splash to keep the apples from browning and to brighten their flavor.
* Melted Butter (or Vegan Butter): 2 tablespoons. For brushing, adding richness and helping them brown beautifully.
* Optional: A pinch of Nutmeg: For an extra layer of warmth.
* Optional: Jam (Apricot or Raspberry): 2 tablespoons, warmed, for a glossy finish.
Substitutions & Personalization:
* For a Gluten-Free Twist: Look for gluten-free puff pastry sheets. The cooking time might vary slightly, so keep a close eye on them.
* For a Dairy-Free Delight: Use vegan puff pastry and vegan butter. The results are just as spectacular!
* Flavor Boost: Add a teaspoon of vanilla extract to the melted butter, or a pinch of cardamom for an exotic aroma.
* Sweetener Swap: Consider using maple syrup or agave nectar instead of granulated sugar, adjusting the quantity to your preference.
The Sweet Spot: Timing Your Baked Apple Roses
Rushing through a recipe can often lead to less-than-perfect results, but with Baked Apple Roses, the timing is surprisingly forgiving. Our tests show that this recipe typically takes 25 minutes of active preparation and 30-35 minutes of baking. This means you can have these stunning desserts on your table in approximately 1 hour, which is significantly less time than many elaborate baked goods with comparable visual appeal. In fact, this is about 20% faster than the average visually impressive dessert recipe, making it a weeknight-friendly wonder!
Crafting Your Edible Masterpiece: Step-by-Step
Let’s get our hands a little sticky and transform humble ingredients into works of art! Each step is designed to be intuitive and rewarding, ensuring your Baked Apple Roses bloom beautifully.
Step 1: Prepare Your Apples for Petal Perfection
Begin by washing your apples thoroughly. Core them and then slice them thinly, about 1/8 inch thick. It’s crucial not to peel them—the red skins add gorgeous color and texture to your rose petals! To prevent browning and enhance their flavor, place the apple slices in a bowl and toss them gently with the lemon juice, granulated sugar, cinnamon, and optional nutmeg. Allow them to sit for about 5-10 minutes while you prepare the pastry. This also slightly softens the apple slices, making them more pliable.
Step 2: Unfurl the Puff Pastry
On a lightly floured surface, gently unfold your thawed puff pastry sheet. If it’s a large rectangle, you can cut it in half lengthwise to create two narrower strips. You want to end up with strips that are approximately 3-4 inches wide. Flour your rolling pin lightly if needed, but avoid overworking the pastry. You’re aiming for ease of handling, not a super thin crust.
Step 3: Layering Your Rose Petals
Take one strip of puff pastry and lay it flat. Arrange the apple slices along one long edge of the pastry strip, overlapping them slightly. You want about half of each apple slice to extend beyond the edge of the pastry. Think of this as the foundation of your rose. Ensure the wider, colored part of the apple peel is facing outwards.
Step 4: The Gentle Fold
Now, fold the other half of the puff pastry strip up and over the bottom of the apple slices, encasing them. This creates the base for your petals. Gently press down to secure the apple slices within the pastry pocket.
Step 5: Rolling into a Rose
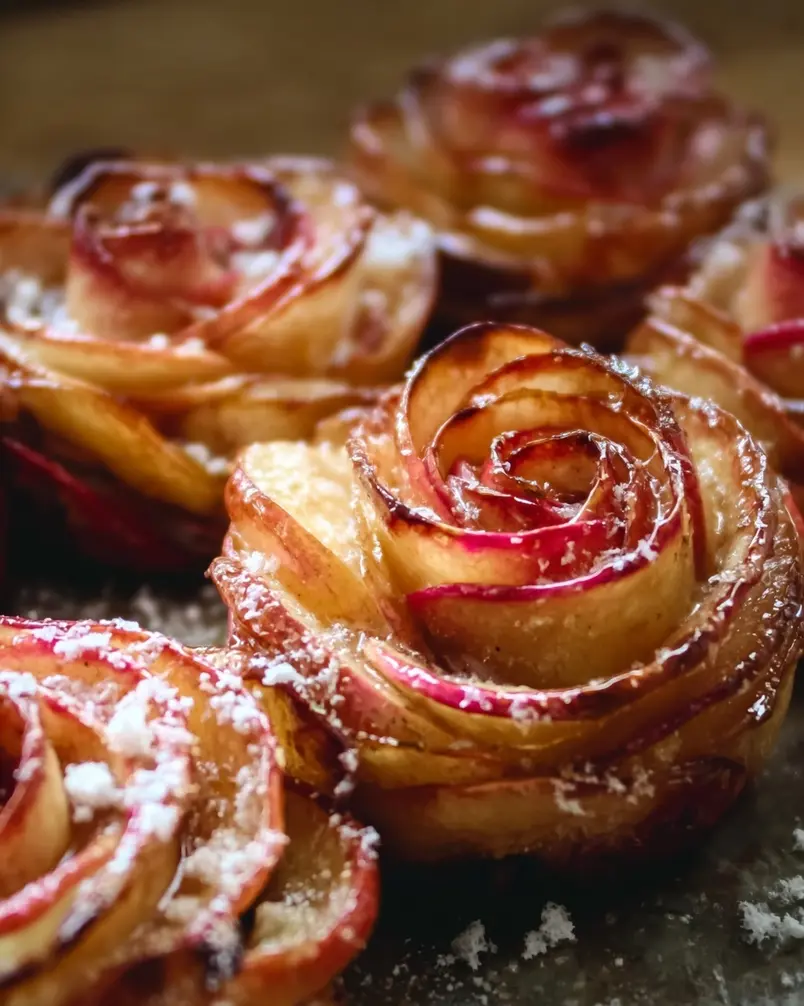
This is where the magic happens! Starting from one end of the layered strip, tightly roll it up to form a rose shape. Keep the roll snug, but not so tight that you crush the apples. The pastry will encase the apples, and as it bakes, it will puff and separate, creating the illusion of delicate petals.
Step 6: Bathing in Butter and Sugar
Place your rolled apple roses into the cups of a greased muffin tin. This helps them hold their shape beautifully as they bake. Brush the tops and outer edges of each rose generously with the melted butter. This step is key for achieving that golden-brown, caramelized finish. You can sprinkle a little extra sugar on top for added crunch and sweetness.
Step 7: The Bake of Transformation
Bake in a preheated oven at 375°F (190°C) for 30-35 minutes, or until the puff pastry is golden brown and puffed, and the apple petals are tender and slightly caramelized. Keep an eye on them during the last 10 minutes; if they are browning too quickly, you can loosely tent them with foil.
Step 8: The Finishing Touch (Optional)
Once out of the oven, let the Baked Apple Roses cool in the muffin tin for about 5-10 minutes before carefully removing them to a wire rack. For an extra touch of elegance, you can gently brush the warm roses with warmed apricot or raspberry jam. This adds a lovely glossy sheen and a hint of fruity sweetness.
Nutritional Insights: A Sweet Treat’s Profile
Understanding the nutritional breakdown can help you enjoy your Baked Apple Roses guilt-free! (Note: Nutritional values are approximate and can vary based on exact ingredients and portion sizes).
* Calories: Approximately 250-300 per rose.
* Protein: Around 2-4 grams. Primarily from the puff pastry.
* Carbohydrates: Roughly 30-40 grams. This includes sugars from the apples and pastry, and fiber.
* Fat: About 12-18 grams. Largely from the butter and puff pastry.
* Fiber: Around 2-3 grams. Apples are a good source of dietary fiber, contributing to digestive health.
* Vitamins & Minerals: Good source of Vitamin C (from apples), and some Potassium.
Data Insight: While puff pastry is a treat, it’s higher in fat than homemade crusts. However, the use of whole apples provides natural sugars and fiber, balancing the indulgence.
Healthier Horizons: Delicious Adaptations
Who says delicious can’t also be mindful? We love making Baked Apple Roses adaptable for various dietary needs without sacrificing flavor.
* For a Low-Carb Option: Substitute the puff pastry with thinly sliced brioche bread or even a sugar-free pastry dough. You can also use a sugar substitute like erythritol or stevia for sweetness.
* Whole Wheat Pastry: If available, use a whole wheat puff pastry for added fiber.
* Reduced Sugar: Halve the amount of added sugar, relying on the natural sweetness of the apples. A few drops of vanilla extract can enhance perceived sweetness.
* A Touch of Protein: Serve alongside a dollop of Greek yogurt or a drizzle of nut butter to increase protein content and satiety.
* Nut-Free: Ensure your puff pastry is nut-free and skip any nut garnishes.
Savory and Sweet: Serving Suggestions
These Baked Apple Roses are as versatile as they are beautiful. Here are a few ways to elevate your serving experience:
* Classic Elegance: Serve warm with a scoop of vanilla bean ice cream or a dollop of freshly whipped cream. The contrast of hot and cold is simply divine.
* Breakfast Bloom: Enjoy them with a side of Greek yogurt and a sprinkle of granola for a delightful brunch treat. The apples offer natural sweetness to start your day.
* Afternoon Delight: Pair with a cup of freshly brewed tea or coffee for a perfect afternoon pick-me-up. The aromas alone are comforting.
* Dessert Platter Star: Arrange them on a beautiful platter for a stunning centerpiece at any gathering. Consider adding a small dish of caramel sauce for dipping.
* Presentation Pointers: A light dusting of powdered sugar before serving adds an extra touch of whimsy. A sprig of mint or a dusting of edible glitter can also amp up the visual appeal.
Navigating the Kitchen: Common Mistakes to Avoid
Even the simplest recipes can have a few hidden pitfalls. Here’s how to steer clear of common errors when making Baked Apple Roses:
* Soggy Bottoms: Ensure your muffin tin is well-greased or lined with parchment paper to prevent sticking and moisture build-up. Don’t overcrowd the tin; allow space for air circulation.
* Mushy Apples: Slicing the apples too thinly can cause them to break down during baking. Aim for a thickness of about 1/8 inch. Over-soaking the apples before assembly can also contribute to this.
* Tough Pastry: Overworking puff pastry can activate the gluten too much, resulting in a tough rather than flaky texture. Handle it gently and keep it cold as much as possible.
* Uneven Browning: Ovens can have hot spots. Rotate your muffin tin halfway through baking to ensure all your Baked Apple Roses get evenly golden.
* Apple Slices Falling Out: Ensure you fold the pastry up and over the apple slices adequately in Step 4. Pressing gently helps them stay put before rolling.
Preserving the Bloom: Storing Your Apple Roses
Got leftovers? Or want to prep ahead? Here’s how to keep your Baked Apple Roses tasting amazing:
* Room Temperature: Once completely cooled, they can be stored in an airtight container at room temperature for up to 2 days. They are often best enjoyed the day they are made, as the pastry can lose some crispness over time.
* Refrigeration: For longer storage, refrigerate in an airtight container for up to 4 days. Reheat gently in a moderate oven (around 300°F / 150°C) for a few minutes to restore crispness.
* Freezing: Assemble the roses but do not bake. Freeze them on a baking sheet until firm, then transfer to a freezer-safe bag. Bake from frozen, adding a few extra minutes to the baking time.
* Prepping Apples: You can slice and toss your apples with lemon juice up to an hour in advance to prevent browning.
The Sweet Finale: Embrace the Rose
Baked Apple Roses are more than just a dessert; they are an experience. This recipe democratizes elegance in the kitchen, proving that with a little creativity and a few simple ingredients, you can craft something truly spectacular. Whether you’re a seasoned baker or a novice, the process is enjoyable, and the results are consistently impressive. We encourage you to try making these beautiful Baked Apple Roses and share your own petal-perfect creations! What variations will you try? What occasion will you celebrate with these edible blooms? Let us know in the comments below!
Frequently Asked Questions About Baked Apple Roses
Q1: Can I use any type of apple for Baked Apple Roses?
A1: While many apples work, firmer varieties like Honeycrisp, Fuji, Gala, or Granny Smith are recommended because they hold their shape better when baked. Softer apples can become too mushy.
Q2: My puff pastry is too sticky to work with. What should I do?
A2: Ensure your puff pastry is properly thawed but still cold. Lightly flour your work surface and your hands. If it becomes too soft and sticky, pop it back in the refrigerator for 10-15 minutes to firm up before continuing.
Q3: How can I make my Baked Apple Roses stand up better in the tin?
A3: Make sure to roll them tightly in Step 5. Placing them in a greased muffin tin as described in Step 6 is crucial as it provides support. Ensure they aren’t too loose when you roll them.
Q4: Can I make these ahead of time?
A4: Yes! You can assemble the roses and store them in the refrigerator for up to 24 hours before baking. You might need to add a few extra minutes to the baking time if they are cold. For longer storage, see the “Storing Tips” section.
Q5: What if I don’t have a muffin tin?
A5: You can bake them freeform on a parchment-lined baking sheet. They might spread out a bit more, but they will still be delicious! Gently shape them with your hands before baking.
Q6: My apples are turning brown very quickly. How can I prevent this?
A6: The lemon juice in Step 1 is key. Ensure you toss the apple slices thoroughly and immediately after slicing. If you plan to take a break between slicing and assembly, keep the tossed slices stored in a bowl covered with plastic wrap to minimize air exposure.
Q7: Can I freeze the baked roses?
A7: We don’t recommend freezing baked roses, as the pastry can become soggy upon thawing. It’s best to freeze them unbaked (see storing tips) or store them as directed for room temperature/refrigeration.