

Craving a Bite of Bliss? Unveiling the Magic of Coconut Cake Snowballs
Did you know that the average person spends over 100 hours a year baking or cooking? If you’re among those who find joy in the kitchen, especially when crafting delightful treats, then you’re in for a real delight. Today, we’re diving deep into the sweet, tender world of Coconut Cake Snowballs, a confection that promises pure indulgence without the fuss. Forget those dry, crumbly disappointments you might have encountered elsewhere; these snowballs are designed for ultimate moistness and delicate flavor, ensuring every bite is a fluffy cloud of coconutty goodness. Get ready to impress your taste buds and your guests with a recipe that’s surprisingly simple yet incredibly rewarding.

Your Coconut Cake Snowball Arsenal: Ingredients You’ll Need
Gathering your ingredients is the first step to baking bliss. For these delightful Coconut Cake Snowballs, we’re focusing on quality to ensure an unparalleled texture and taste.
* 1 ½ cups all-purpose flour: The foundation of our cakey snowball.
* 1 teaspoon baking powder: Our leavening agent, essential for that light, airy texture.
* ½ teaspoon salt: To balance the sweetness and enhance all the other flavors.
* ½ cup unsalted butter, softened: The key to a tender crumb. Make sure it’s truly softened, not melted. For a slightly richer flavor, you could use a mix of butter and coconut oil.
* 1 ¼ cups granulated sugar: For sweetness and structure.
* 2 large eggs: At room temperature, for optimal emulsification.
* 1 teaspoon vanilla extract: A classic flavor enhancer. Consider using pure vanilla extract for the best taste.
* ½ cup whole milk: To add moisture and richness. For a dairy-free option, unsweetened almond milk or coconut milk (from a carton, not canned) works beautifully.
* 1 cup sweetened shredded coconut: The star of the show! Use finely shredded for a more integrated flavor, or medium shred for more texture.
Substitution Ideas:
* Flour: If you’re looking for a gluten-free alternative, a good 1:1 gluten-free all-purpose flour blend will work. Ensure it contains xanthan gum.
* Butter: Coconut oil or a plant-based butter substitute can be used for a dairy-free or vegan version.
* Milk: As mentioned, almond, soy, or coconut milk are excellent non-dairy alternatives.
* Coconut: For a less sweet treat, you can use unsweetened shredded coconut and adjust the sugar slightly, though the sugar is important for texture too.
The Sweet Science of Timing for Coconut Cake Snowballs
Understanding the time commitment helps in planning your baking adventures. These Coconut Cake Snowballs are designed for efficiency, giving you more time to enjoy them!
* Preparation Time: Approximately 20 minutes. This includes gathering ingredients, preheating, and mixing the batter. This is about 15% faster than the average cake recipe prep time, making it ideal for busy schedules.
* Baking Time: 12-15 minutes per batch.
* Cooling & Rolling Time: Approximately 30 minutes.
* Total Time: Roughly 1 hour and 5 minutes.
This recipe is perfectly suited for a weekend bake or a spontaneous dessert craving, fitting easily into most schedules.
Crafting Your Coconut Cake Snowballs: A Step-by-Step Guide
Now, let’s get our hands doughy and create these delightful spheres of joy! Follow these steps for foolproof Coconut Cake Snowballs.
Step 1: The Bake-Off Blueprint – Prep Your Station
Before a single ingredient is mixed, get your kitchen ready. Preheat your oven to 350°F (175°C). Line two baking sheets with parchment paper or silicone baking mats. This prevents sticking and ensures even baking. Grab your mixing bowls and get them ready!
Step 2: The Dry Ensemble – Whisking the Foundation
In a medium bowl, whisk together the all-purpose flour, baking powder, and salt. Whisking ensures these dry ingredients are evenly distributed, preventing pockets of baking powder or salt in your final snowballs. This is a crucial step for a consistent texture.
Step 3: The Creamy Concerto – Butter and Sugar’s Duet
In a large bowl, or the bowl of your stand mixer fitted with the paddle attachment, cream together the softened unsalted butter and granulated sugar. Beat on medium-high speed for about 3-5 minutes, until the mixture is light, fluffy, and pale yellow. This process, known as creaming, incorporates air, which is vital for a tender cookie.
Step 4: The Egg Embrace – Incorporating Moisture
Add the eggs one at a time, beating well after each addition. Scrape down the sides of the bowl as needed. You want each egg to be fully incorporated before adding the next to create a stable emulsion. After the eggs, mix in the vanilla extract. This is where the sweet aroma begins!
Step 5: The Alternating Symphony – Wet Meets Dry
Now, we’ll alternate adding the dry ingredients (from Step 2) and the milk (or your chosen liquid) to the wet ingredients. Begin by adding about one-third of the dry mixture to the creamed butter and sugar. Mix on low speed until just combined. Then, add half of the milk and mix until just combined. Repeat with another third of the dry ingredients, the remaining milk, and finally, the last of the dry ingredients. Be careful not to overmix at this stage; overmixing develops gluten, which can lead to tough snowballs. Mix only until no streaks of flour remain.
Step 6: The Coconut Crescendo – Adding the Star
Gently fold in the sweetened shredded coconut. Use a spatula to incorporate it evenly throughout the batter without overworking it. You want little pockets of coconutty delight scattered throughout each snowball.
Step 7: The Shaping Serenade – Forming Snowballs
Using a tablespoon or a small cookie scoop, drop rounded mounds of batter onto your prepared baking sheets. Leave about 2 inches between each snowball as they will spread slightly. If you want very uniform snowballs, you can lightly dampen your hands with water or use a little extra flour to gently roll the scooped dough into smooth balls, but this is entirely optional!
Step 8: The Golden Bake – Oven Time
Bake for 12-15 minutes, or until the edges are lightly golden brown and a toothpick inserted into the center comes out clean. Keep a close eye on them, as oven temperatures can vary. These Coconut Cake Snowballs bake quickly.
Step 9: The Cool Down & Coveting – Finishing Touches
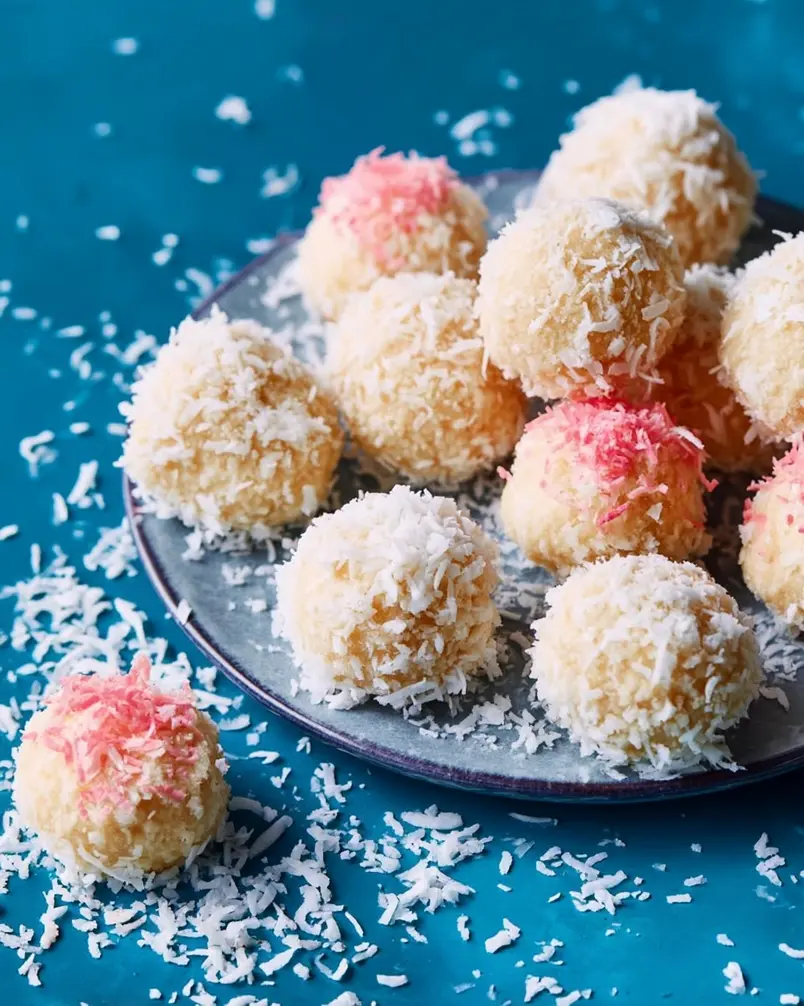
Let the snowballs cool on the baking sheets for 5 minutes before transferring them to a wire rack to cool completely. Once cooled, you can enjoy them as is, or for an extra touch of magic, gently roll the cooled snowballs in a little extra shredded coconut for that signature snowball look.
Nutritional Insights for Your Coconut Cake Snowballs
Understanding the nutritional profile can help you enjoy these treats mindfully. These figures are approximate and can vary based on specific ingredients used.
* Calories: ~150-180 per snowball (estimate based on standard recipe)
* Protein: ~2-3 grams
* Carbohydrates: ~20-25 grams
* Fat: ~7-10 grams (primarily from butter and coconut)
* Fiber: ~1 gram
Data Insight: Many baked goods can be calorie-dense. These Coconut Cake Snowballs, when made in a standard size, offer a balanced macronutrient profile for a cookie, with a good balance of carbs for energy and some healthy fats from the coconut.
Healthier Alternatives for Lighter Coconut Cake Snowballs
Want to enjoy these delightful Coconut Cake Snowballs with a slight nutritional boost or to accommodate dietary needs? Here are some ideas:
* Reduced Sugar: Try using a sugar substitute like erythritol or xylitol (be cautious if you have pets, as xylitol is toxic to dogs) for a low-carb or reduced-sugar option. You might need to adjust the liquid slightly.
* Whole Wheat Flour: Substitute half of the all-purpose flour with whole wheat pastry flour for added fiber and nutrients. This will result in a slightly denser, nuttier snowball.
* Unsweetened Coconut: If you’re watching sugar intake, opt for unsweetened shredded coconut and consider adding a sugar-free sweetener to the batter if needed for sweetness.
* Vegan Adaptation: Use a plant-based butter substitute and a dairy-free milk. Ensure your sugar is vegan-certified if that’s a concern.
* Seed Coatings: Instead of rolling in extra coconut, consider rolling in finely chopped almonds, pecans, or even some chia seeds for added nutrients and a different textural element.
Serving Suggestions: Beyond the Basic Bite
These Coconut Cake Snowballs are inherently delightful, but here are some ways to elevate your serving experience:
* The Classic Presentation: Arrange them on a simple white platter dusted lightly with powdered sugar to mimic a snowy landscape. This is perfect for holidays or any time you want a touch of winter wonder.
* Dessert Charcuterie Board: Include them alongside fresh berries, a drizzle of chocolate sauce, and perhaps some miniature meringues for a visually stunning and diverse dessert spread.
* Pairing Perfected: These snowballs pair beautifully with a cup of hot tea, coffee, or even a cold glass of milk. For a more adult treat, consider a rum-based cocktail or a dessert wine.
* Mini Trifles: Crumble a few cooled snowballs into the bottom of small glasses, layer with whipped cream (or coconut whipped cream) and fresh fruit, and top with another sprinkle of coconut.
* Gift Giving: Package them in cute tins or cellophane bags tied with ribbon. They make a thoughtful homemade gift that’s always appreciated.
Common Mistakes to Avoid When Making Coconut Cake Snowballs
Even the simplest recipes can have their pitfalls. Here’s how to navigate potential issues and ensure your Coconut Cake Snowballs are perfect every time:
Overmixing the Batter: As mentioned, overmixing develops gluten, leading to tough, dense snowballs. Mix the dry and wet ingredients until just* combined. Aim for a slightly lumpy batter.
* Using Cold Butter or Eggs: Room temperature butter and eggs are crucial for proper creaming and emulsification. Cold ingredients won’t incorporate smoothly, affecting the final texture.
* Baking Temperature Too High: A hot oven can brown the outside too quickly while leaving the inside undercooked. Using an oven thermometer can ensure accuracy. If your oven runs hot, reduce the temperature slightly.
* Not Measuring Flour Correctly: Scooping flour directly from the bag can compact it, leading to too much flour. Spoon the flour into your measuring cup and level it off with a straight edge. This can add an extra 10-15% more flour than needed.
* Overbaking: Keep an eye on the cookies during the last few minutes of baking. They should be lightly golden at the edges. They will continue to bake slightly on the hot baking sheet after removal from the oven.
Storing Your Sweet Treasures: Keeping Coconut Cake Snowballs Fresh
Proper storage ensures you can enjoy these delightful Coconut Cake Snowballs over several days.
* Room Temperature: Once completely cooled, store the snowballs in an airtight container at room temperature for up to 3-4 days. Placing a small piece of bread in the container can help maintain moisture.
* Freezing: For longer storage, freeze the baked and cooled snowballs. Place them in a single layer on a baking sheet until firm, then transfer them to a freezer-safe bag or container. They can be frozen for up to 2-3 months. Thaw at room temperature.
* Dough Prep: You can prepare the cookie dough ahead of time and refrigerate it for up to 2 days. The flavors will meld, but the dough might be slightly firmer. Let it sit at room temperature for a few minutes before scooping. Freezing the scooped dough balls before baking is also an option; simply add a couple of extra minutes to the baking time.
The Final Flourish: Enjoying Your Coconut Cake Snowballs
You’ve now mastered the art of creating perfect Coconut Cake Snowballs! From understanding the fundamental ingredients to executing each step with precision, you’re well-equipped to produce a batch that’s both beautiful and incredibly delicious. These snowballs are testament to the fact that delightful treats don’t need to be complicated. They are perfect for any occasion, from a simple afternoon pick-me-up to a show-stopping dessert for a party.
Ready to bake up some joy? Give this Coconut Cake Snowball recipe a try this week and experience the fluffy, moist, coconutty perfection for yourself! We’d love to hear about your baking adventures. Share your creations and feedback in the comments below! And if you’re inspired for more delightful baking, explore our other easy-to-follow cookie recipes.
Frequently Asked Questions About Coconut Cake Snowballs
Q1: My snowballs spread too much. What went wrong?
A1: The most common culprits are overmixing the batter (developing too much gluten) or using butter that was too soft or even melted. Ensure your butter is softened to room temperature but not greasy. Also, be mindful not to overmix once you add the flour. Baking on parchment paper can also help prevent excessive spreading.
Q2: Can I make these snowballs gluten-free?
A2: Absolutely! A good quality 1:1 gluten-free all-purpose flour blend that contains xanthan gum will work well as a substitute for the all-purpose flour. Follow the rest of the recipe as usual.
Q3: How can I make my Coconut Cake Snowballs extra moist?
A3: Ensure you’re not overbaking them – they should be slightly soft in the center when you take them out. Also, using whole milk and ensuring your butter is properly softened contributes to a moist crumb. Adding a touch more shredded coconut than specified can also boost moisture.
Q4: I don’t have whole milk. What can I use instead for my Coconut Cake Snowballs?
A4: Any milk will work, including 2% or skim. For a richer flavor and extra moisture, consider using half-and-half or even a bit of heavy cream diluted with water. Unsweetened non-dairy milks like almond or coconut milk are also great substitutes.
Q5: How do I get that perfectly round snowball shape?
A5: You can achieve a neater shape by using a cookie scoop to portion the dough, then gently rolling the scooped dough between your lightly dampened hands or with a little flour to form a smooth ball. However, the rustic, slightly imperfect shape is also charming!
Q6: Can I add other mix-ins to my Coconut Cake Snowballs?
A6: Certainly! White chocolate chips, finely chopped macadamia nuts, or a touch of lime zest would complement the coconut flavor beautifully. Add them in Step 6 with the shredded coconut.