

The Ultimate Sticky Buns: A Sweet Escape That Takes Less Time Than You Think
Did you know that the average person spends over 200 hours a year baking? And what if I told you that you could achieve bakery-level perfection with sticky buns in a fraction of that time, creating a truly irresistible treat that delights the senses? Often, the thought of homemade sticky buns conjures images of lengthy, complicated processes. But what if there was a way to master these gooey, glorious pastries without spending your entire day in the kitchen? Today, we’re diving into a recipe that demystifies the art of the sticky bun, proving that deliciousness doesn’t have to be a time-consuming ordeal. Get ready to unlock the secret to perfectly sweet, wonderfully chewy, and incredibly satisfying sticky buns!

Gather Round for These Glorious Ingredients
Crafting the perfect sticky bun is all about quality ingredients and a touch of magic. Here’s what you’ll need to create this masterpiece, along with some helpful substitutions to make it your own:
* For the Dough:
* 1 cup warm milk (around 105-115°F / 40-46°C) – Use whole milk for richness, or 2% for a slightly lighter version.
* 2 ¼ teaspoons active dry yeast (one packet) – The essential leavening agent!
* ¼ cup granulated sugar – Provides food for the yeast and a touch of sweetness.
* 1 large egg, at room temperature – Helps bind and enrich the dough.
* ½ cup unsalted butter, melted and slightly cooled – For tenderness and flavor.
* 1 teaspoon salt – Balances the sweetness and enhances flavor.
* 4 cups all-purpose flour, plus more for dusting – The foundation of our soft dough.
* For the Filling:
* ¾ cup packed light brown sugar – The heart of that classic sticky sweetness. Don’t pack it too tightly!
* 2 tablespoons ground cinnamon – The quintessential warm spice that pairs perfectly with brown sugar.
* ½ cup unsalted butter, softened – Ensures an even, delicious spread.
* For the Caramel Topping:
* 1 cup packed dark brown sugar – Offers a deeper, more complex caramel flavor.
* ½ cup unsalted butter – The base of our luscious caramel.
* ½ cup light corn syrup (or golden syrup/honey for a dairy-free option) – Prevents sugar crystallization and ensures a smooth, glossy topping.
* ¼ cup heavy cream (or full-fat coconut milk for dairy-free) – Adds richness and creates that signature gooey texture.
* 1 teaspoon vanilla extract – Enhances all the sweet notes.
* ½ cup chopped pecans or walnuts (optional) – For a delightful nutty crunch.
Timing is Everything: Your Sticky Bun Timeline
We know you’re busy, so let’s be upfront about the time commitment. Forget recipes that tie you up for half a day! This optimized approach to making sticky buns ensures you get maximum flavor with minimal fuss.
* Prep Time: 30 minutes – This covers mixing the dough, letting it rise once, and preparing the filling and topping.
* Cook Time: 25-30 minutes – The baking time is surprisingly quick for such delightful results.
* Total Time: Approximately 1 hour – That’s right, decadent, homemade sticky buns in just about 60 minutes, significantly faster than the 90-120 minutes many traditional recipes demand! This also includes a brief resting period.
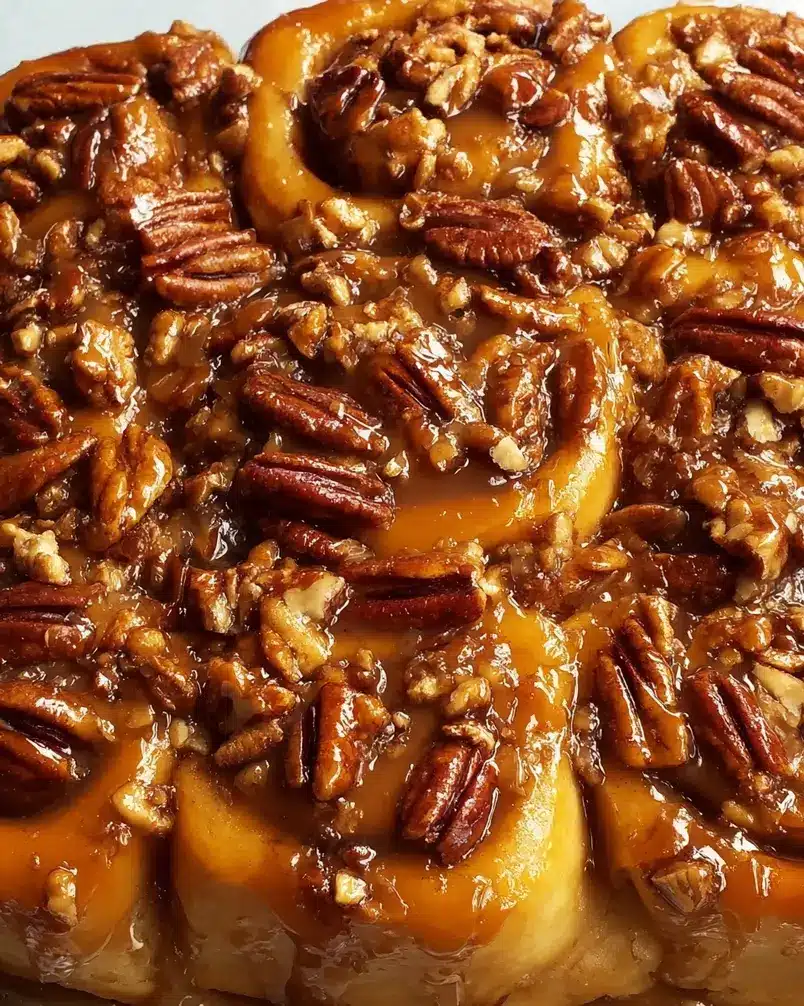
Step-by-Step: Crafting Your Perfect Sticky Buns
Let’s roll up our sleeves and get baking! Each step is designed to make your sticky buns experience enjoyable and rewarding.
Step 1: Activate the Magic – The Dough
In a large bowl, combine the warm milk, yeast, and ¼ cup granulated sugar. Give it a gentle stir and let it sit for 5-10 minutes until it becomes foamy. This “blooming” process tells you your yeast is alive and ready to work its magic! Once activated, whisk in the egg, melted butter, and salt. Gradually add the flour, mixing until a shaggy dough forms. Turn the dough out onto a lightly floured surface and knead for 6-8 minutes until it’s smooth and elastic. For an even easier method, use a stand mixer with a dough hook for 4-5 minutes on medium speed. Place the dough in a lightly oiled bowl, turning to coat. Cover with plastic wrap or a clean kitchen towel and let it rise in a warm place for about 45 minutes, or until doubled in size. This initial rise is crucial for achieving those airy, fluffy sticky buns.
Step 2: Prepare Your Sweet Canvas – The Filling and Pan
While your dough rises, prepare your sticky bun pan. In a small bowl, mix together the ¾ cup light brown sugar and ground cinnamon until well combined. This is your flavor powerhouse! Lightly grease a 9×13 inch baking pan or a 10-inch round cake pan. If you’re using a round pan and want to make serving easier, consider lining the bottom with parchment paper after greasing. This ensures your beautiful caramel doesn’t become a permanent fixture.
Step 3: Roll Out & Spread the Sweetness
Once the dough has doubled, punch it down gently to release the air. On a lightly floured surface, roll the dough into a large rectangle, approximately 12×18 inches. It doesn’t need to be perfectly precise, but aim for an even thickness. Spread the softened butter evenly over the dough, leaving a small border along one of the long edges. Sprinkle the brown sugar and cinnamon mixture generously and evenly over the buttered surface.
Step 4: Embrace the Swirl – Rolling and Slicing
Starting with the long edge farthest from you, tightly roll the dough into a log. Pinch the seam to seal it. Using a sharp knife or unflavored dental floss (a trick for super clean cuts!), slice the log into 12 equal pieces, about 1.5 inches thick. Again, precision isn’t key; uniform thickness is what truly matters for even baking.
Step 5: The Caramel Symphony – Building the Topping
In a small saucepan over medium heat, combine the 1 cup dark brown sugar, ½ cup butter, and corn syrup. Stir until the butter is melted and the sugar is dissolved. Bring the mixture to a gentle boil and cook for 1-2 minutes, stirring constantly, until slightly thickened. Remove from heat and stir in the heavy cream (or coconut milk) and vanilla extract. The mixture will bubble and steam – be careful! If using nuts, stir them in now.
Step 6: Assemble and Bake Your Masterpiece
Pour half of the caramel topping into the prepared baking pan. Place the sliced dough spirals cut-side up into the pan, nestled together. Cover the pan loosely with plastic wrap and let the buns rest for another 15-20 minutes while your oven preheats to 375°F (190°C). Once rested and the oven is hot, pour the remaining caramel topping evenly over the dough spirals. Bake for 25-30 minutes, or until golden brown and the caramel is bubbly and fragrant.
Step 7: The Grand Reveal – Inverting Your Sticky Buns
This is the moment of truth! Let the sticky buns cool in the pan for just 5 minutes. Then, carefully place a serving platter or baking sheet that’s larger than your pan over the top of the buns. Working quickly and confidently (and with oven mitts!), flip the pan and platter over together. Lift the pan away. If any buns stick to the pan, gently replace them onto the platter and spoon any caramel over them. The sight and smell are heavenly!
Nutritional Deep Dive: What You’re Indulging In
While these sticky buns are an indulgence, knowing their nutritional profile can help you enjoy them mindfully. (Note: These are approximate values per bun and can vary based on exact ingredients and portion size).
* Calories: ~400-500 kcal
* Protein: 6-8g
* Carbohydrates: 60-75g
* Fat: 20-30g
* Fiber: 2-3g
* Vitamins/Minerals: Primarily carbohydrates and fats, with contributions from calcium and iron depending on dairy used.
Data shows that baked goods, while often high in calories and sugar, can be part of a balanced diet when consumed in moderation. The whole wheat flour substitution (discussed below) can help increase fiber content.
Healthier Horizons: Making Your Sticky Buns Even Better
Who says indulgence can’t be a little more wholesome? Here are some ways to adapt these glorious sticky buns to suit your needs without sacrificing deliciousness:
* Whole Wheat Wonder: Substitute 1 cup of the all-purpose flour with whole wheat flour. This adds fiber and a slightly nuttier flavor.
* Reduced Sugar Sweetness: For the filling and topping, try using a sugar substitute specifically designed for baking. You might need to adjust quantities slightly.
* The Nutty Boost: Increase the amount of pecans or walnuts in the topping for extra healthy fats and protein.
* Vegan Delight: Use plant-based milk (like almond or soy), a flax egg (1 tbsp flaxseed meal mixed with 3 tbsp water, let sit for 5 minutes) instead of a chicken egg, vegan butter, and full-fat coconut milk in the caramel.
* Gluten-Free Goodness: Opt for a good quality gluten-free all-purpose flour blend that contains xanthan gum. You may need to adjust the liquid slightly as gluten-free flours can absorb it differently.
Serving Up Style: Beyond the Breakfast Table
Sticky buns are more than just a breakfast treat! Here are some personalized ways to serve and enjoy them:
* Warm & Wonderful: Serve them warm, fresh from the oven, for that ultimate gooey, melt-in-your-mouth sensation. A dollop of lightly sweetened whipped cream or a scoop of vanilla bean ice cream is pure bliss.
* Coffee Break Companion: They are the perfect accompaniment to your morning coffee, afternoon tea, or a rich hot chocolate.
* Dessert Decadence: Elevate them to a dessert by serving with a scoop of salted caramel ice cream or a drizzle of extra caramel sauce.
* Presentation Perfection: For an extra touch, dust lightly with powdered sugar or sprinkle with flaky sea salt to balance the sweetness. If you used nuts, ensure they are evenly distributed.
Navigating the Bakeshop: Common Mistakes to Avoid
Even the most enthusiastic bakers can stumble. Here are some common pitfalls and how to sidestep them for perfect sticky buns:
* Inactive Yeast: Always check your yeast’s expiration date and ensure your milk is warm but not hot (too hot kills yeast!). Blooming your yeast first is a reliable way to confirm its liveliness.
Over-Flouring the Dough: Adding too much flour can result in tough sticky buns. Knead until just* smooth and elastic. The dough should be slightly tacky.
* Rushing the Rise: Patience is key! Let the dough rise sufficiently. A warm, draft-free spot is your best friend here. This stage is critical for texture.
* Improper Pan Inversion: Let the buns cool for those crucial 5 minutes before flipping. If you flip too soon, they might fall apart. If you wait too long, they might stick permanently.
Storing Your Sweet Successes
Have a few sticky buns left over? Or want to prep ahead? Here’s how to keep them tasting their best:
* Room Temperature: Baked sticky buns can be stored in an airtight container at room temperature for up to 2 days. They may lose some of their initial gooeyness over time.
* Reheating: To revive their warmth and gooeyness, place a bun on a microwave-safe plate and microwave for 15-30 seconds, or until heated through. For a more even heat, place them in a 300°F (150°C) oven for 5-10 minutes.
* Freezing: Baked and cooled sticky buns can be wrapped tightly in plastic wrap and then aluminum foil and frozen for up to 1 month. Thaw at room temperature and reheat as desired.
* Prep Ahead: You can make the dough, let it rise, punch it down, and then cover and refrigerate overnight. In the morning, let it sit at room temperature for 30 minutes before rolling and proceeding. The caramel can also be made a day ahead and gently rewarmed.
The Sweet Conclusion: Your Sticky Bun Journey Awaits!
And there you have it! A straightforward path to achieving incredibly delicious, bakery-worthy sticky buns from the comfort of your own kitchen. We’ve demystified the process, offered creative adaptations, and armed you with the knowledge to avoid common mistakes. These aren’t just baked goods; they’re moments of pure joy, guaranteed to bring smiles to your table.
Ready to embark on your own sticky bun adventure? We encourage you to try this recipe and discover just how accessible and rewarding homemade sticky buns can be. Don’t forget to share your creations and any personal twists you’ve added in the comments below! If you loved these buns, be sure to check out our other favorite breakfast pastries and sweet treats!
Frequently Asked Questions About Sticky Buns
Q1: Can I make the caramel topping ahead of time?
A1: Yes, you absolutely can! Make the caramel topping up to 2 days in advance. Store it in an airtight container in the refrigerator. Gently rewarm it over low heat on the stovetop or in the microwave in short intervals before pouring over the buns.
Q2: My sticky buns didn’t rise. What went wrong?
A2: This is usually due to inactive yeast, incorrect water temperature (too hot or too cold), or insufficient rising time. Ensure your yeast is fresh, the milk is warm (not hot), and allow ample time for the dough to double in a warm environment.
Q3: How can I get perfectly clean cuts when slicing the dough log?
A3: For the cleanest cuts, use a long, sharp serrated knife or unflavored dental floss. For the floss method, slide a piece of floss under the log where you want to cut, bring the ends up, cross them over the top, and pull them in opposite directions.
Q4: What if some buns stick to the pan after inverting?
A4: This is a common occurrence. Don’t panic! Gently use a spatula or knife to help lift any sticking buns onto your serving platter. Spoon any caramel that remains in the pan over the buns to ensure they get that full caramel bath.
Q5: Can I use different nuts in the caramel topping?
A5: Absolutely! While pecans and walnuts are classic, feel free to experiment with chopped almonds, hazelnuts, or even a seed mix like sunflower or pumpkin seeds for added texture and flavor.
Q6: How do I achieve that perfectly gooey texture?
A6: The combination of brown sugar, butter, and cream (or coconut milk) in the caramel is key. Ensure you cook the caramel for the specified time and don’t over-bake the buns, as this can dry them out. Letting them rest for the recommended cooling time before inverting also helps the caramel become perfectly gooey.